My infra updates itself!
⚠️ This article is an automated translation. While I personally reviewed the content before publication, some inaccuracies may remain. Read the original French version.
In the previous post, I explained how my personal infra works, with an Ansible structure allowing me to deploy each service independently of the others. This way of managing my infra has allowed me to save a lot of time, but there was still one long, boring, and repetitive thing to do: Updating my infra.
If you have ever hosted services yourself over a fairly long time, you know that updates are the poor relation of infrastructures (and even in companies, don’t tell me your park is always up to date). If modern containerization and orchestration solutions (Podman, Docker, Kubernetes Swarm, Rancher, […]) have solved many problems by cleanly decoupling the OS and services, it remains that updates are often experienced as a suffering: it’s pure run time, lost “doing nothing”. And generally, updates happen like this:
- We deploy our beautiful new services on our favorite orchestrator;
- We forget this service for 8 months;
- Your company’s SOC (or yourself with your watch) finds a vulnerability;
- You have to urgently update the service in question, except there are 5 versions apart;
- And you spend 2 days migrating when you would have spent 20x less time doing it as you go.
At home, it’s much simpler, we go fire & forget, the deployed service is now a production that no one will touch anymore. 😎
However, at home, I also have prod. It might just be my prod, but it’s nonetheless important to me (and that’s why it’s backed up, by the way, cf this post): my passwords, my files, my calendar, my emails, my code… In short, only things I don’t want to see exposed because of a potential security flaw. Except that, quite logically, my infra at home is not my full-time job. It’s a side-project (or even a side-side-project), on which I spend little time. I therefore had to find a solution to automate all this a bit, and regain true digital hygiene on this part.
And it’s a good thing, because a few months ago, Olivier arrived at the office with stars in his eyes and introduced us to n8n (pronounced nodemation). n8n is a workflow engine, like IFTTT or Zapier, but much more generalist (and open-source + self-hostable)! He uses it to automate his tech watch, and I can only encourage you to go read his excellent blog post on this subject.
By the way, know that I totally copied his idea at home, and it’s really too practical: I receive local, IT news, and upcoming conferences on my Discord server (and alerts when T2C cuts the tramway 🤬).
And, based on this observation, I asked myself a question: What if n8n could detect updates on my infra, propose them to me, and deploy them? Well guess what: it’s possible, and I did it! So, after this MUCH too long introduction, let’s go automate our updates. 😎
Base Infra
For the needs of this article, we will start on the following predicates:
- You have an infra that publishes its services on a Docker Swarm;
- Note: The only important thing Swarm gives me is the automatic rollback of services. It will work wonderfully on a Kubernetes, Minikube, Rancher, or any container orchestrator worth its name. By the way, my swarm is single-node, so really, as long as you have auto-rollback, we don’t care about the rest.
- You deploy your infra with Ansible;
- Note: The only important thing Ansible gives me is the possibility to launch a deployment automatically from a CI. Puppet, Salt, Chef, ArgoCD… As long as you have something that allows doing that, same thing, it will work. Even bash is ok (as long as it can read environment variables).
- You have a GitLab server with a runner available (and this runner can deploy on your server).
- Note: You understood, here GitLab just serves to launch pipelines automatically. Jenkins, Gitea, BitBucket, GitHub Actions… Anything will do (you just need to be able to add environment variables at execution).
- You also need an account and a Discord server (it’s free and takes 5 minutes to do).
- You can use any other messaging system compatible with n8n (Telegram, mail, Matrix, etc.)
You understood, this infra is absolutely not mandatory: adapt to your environment, you’ll see, it won’t take long.
Installing n8n
First thing to do: Install n8n. For that, nothing simpler, we are going to start a new Swarm service. And since we are not savages, we are going to do it with Ansible:
---
- name: "deploy n8n"
  hosts: app_servers
  vars:
    data_location: "/srv/n8n" #Change with your value
  tasks:
    - name: "create dirs"
      ansible.builtin.file:
        path: "{{ item }}"
        state: directory
        mode: '0777'
      loop:
        - "{{ data_location }}/data"
        - "{{ data_location }}/files"
    - name: "Create n8n service"
      run_once: true
      community.general.docker_swarm_service:
        name: "n8n"
        image: "docker.n8n.io/n8nio/n8n:1.105.3"
        mode: "replicated"
        replicas: 1
        mounts:
          - source: "{{ data_location }}/data"
            target: "/home/node/.n8n"
            type: "bind"
          - source: "{{ data_location }}/files"
            target: "/files"
            type: "bind"
        publish:
          - mode: "ingress"
            protocol: "tcp"
            published_port: 5678
            target_port: 5678
        rollback_config:
          failure_action: "pause"
          order: "stop-first"
        update_config:
          failure_action: "rollback"
          order: "stop-first"
          monitor: "1m"
        restart_config:
          condition: any
          delay: 5s
          max_attempts: 3
          window: 120s
Your n8n server should be accessible on port 5678 of your server. Log in to the interface. Now, let’s take a bit of time to talk about the operation of n8n strictly speaking.
n8n, its Life, its Work
n8n is a workflow engine. A workflow consists of a set of actions that will be executed by n8n sequentially. These actions can be chained. Thus, action 2 can be based on the result of action 1, and so on.
And workflows can be triggered in several ways: automatically, manually, based on an external event, etc. Moreover, this is the great strength of n8n: there are connectors (actions and triggers) for just about anything and everything, ranging from Discord to Palo Alto via Gemini and Dropbox.
Let’s start with a very simple example: retrieving an RSS feed, and sending the new elements to a Discord channel. Create a new workflow in your n8n, and you will arrive on this interface:
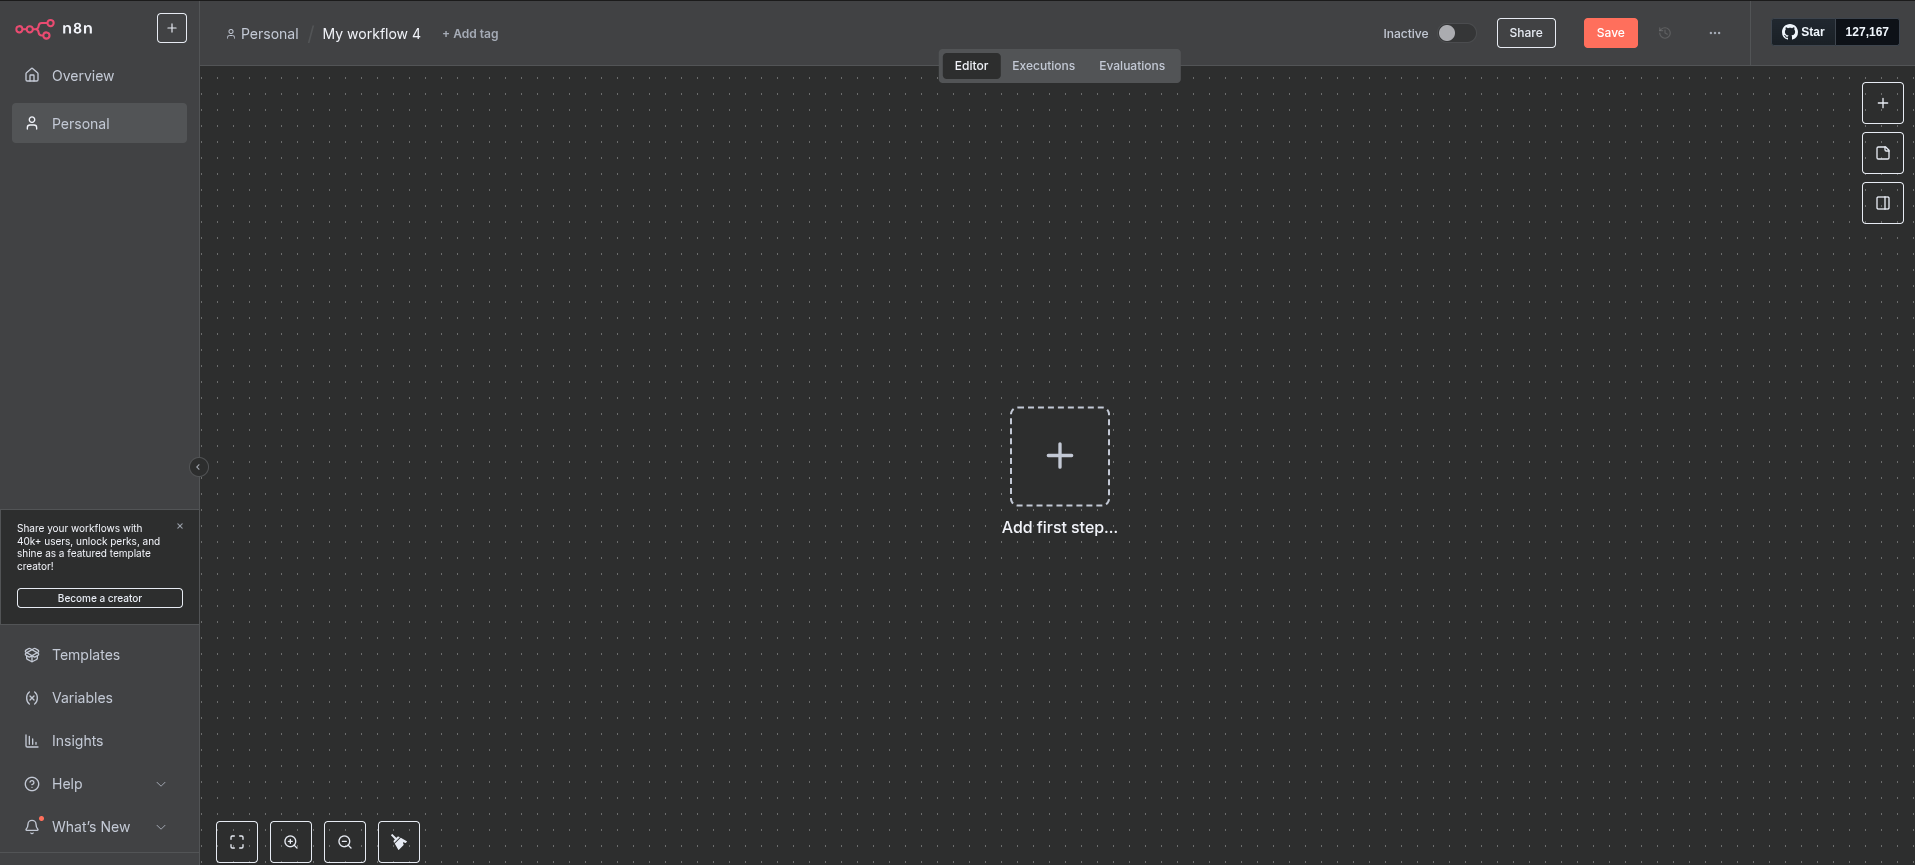
Let’s click on “Add first step”. This first step must absolutely be a trigger, i.e., a step that allows starting our workflow. You can see that many options are available: From a webhook, on demand, according to a cron, etc. Search for “RSS” in the search bar, and select “RSS Feed Trigger”.
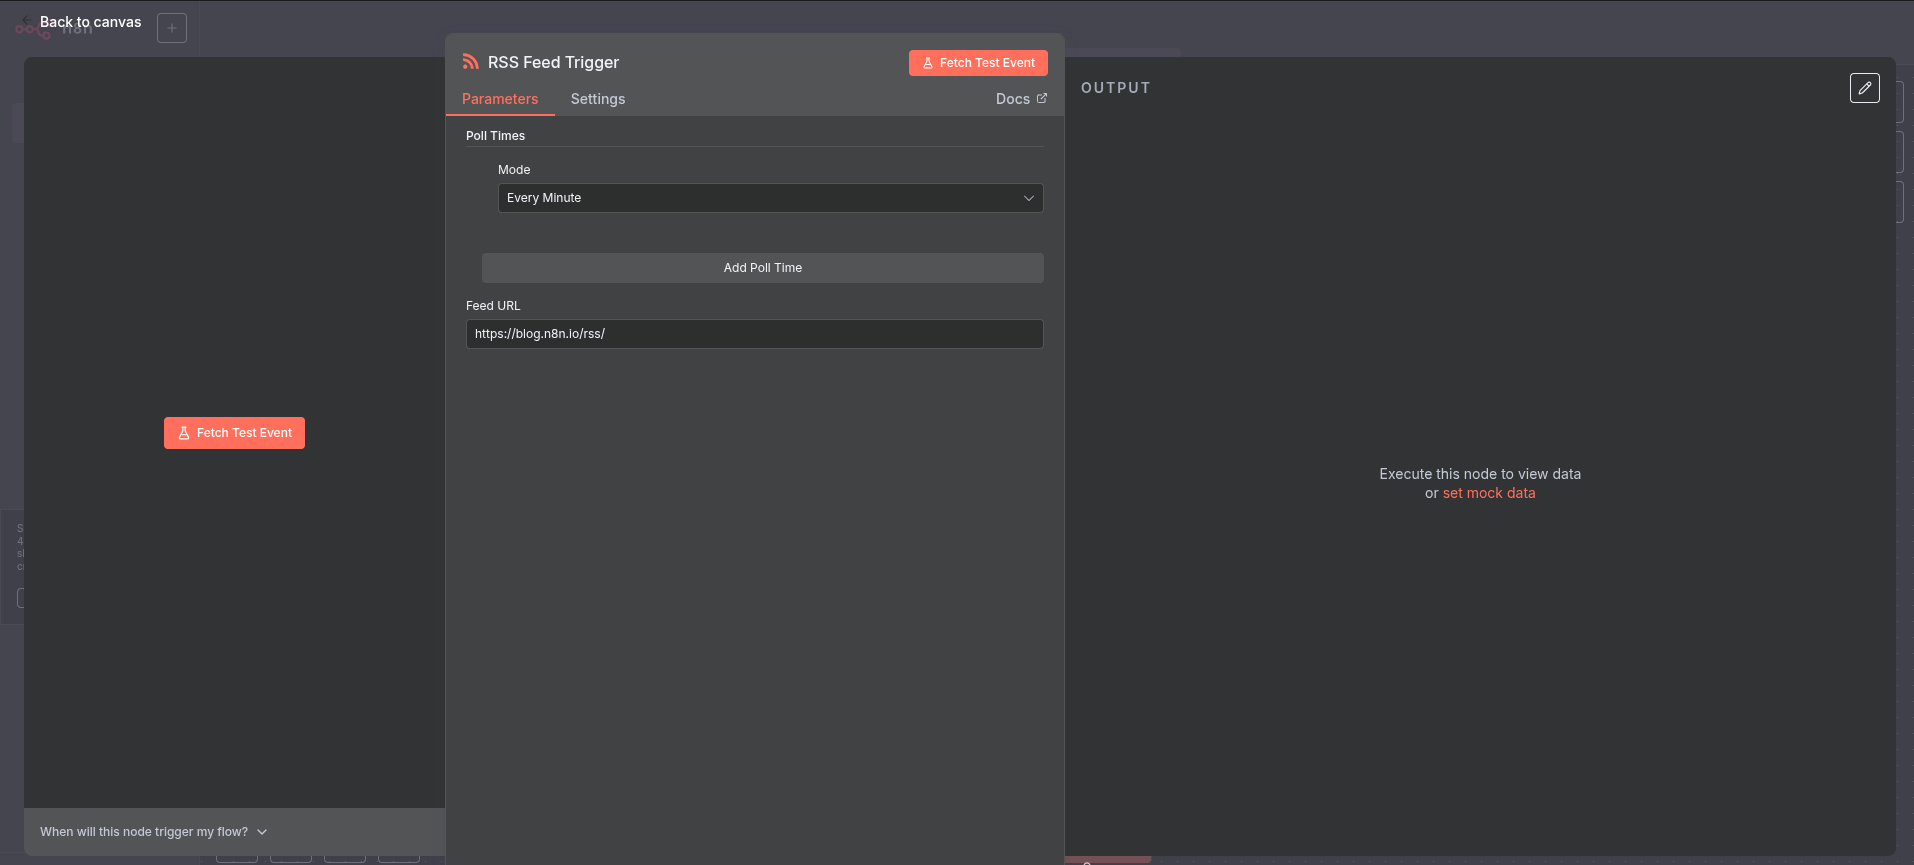
Here you are in the configuration of a node. For each step, you will be able to give information to n8n to indicate how the node in question should behave. Here, the trigger is quite simple: you can define the frequency at which the workflow will execute, and an RSS address. You can use the one from the blog for your tests (https://forestier.re/index.xml). Click on “Fetch Test Event”, and you should see the right part display content:
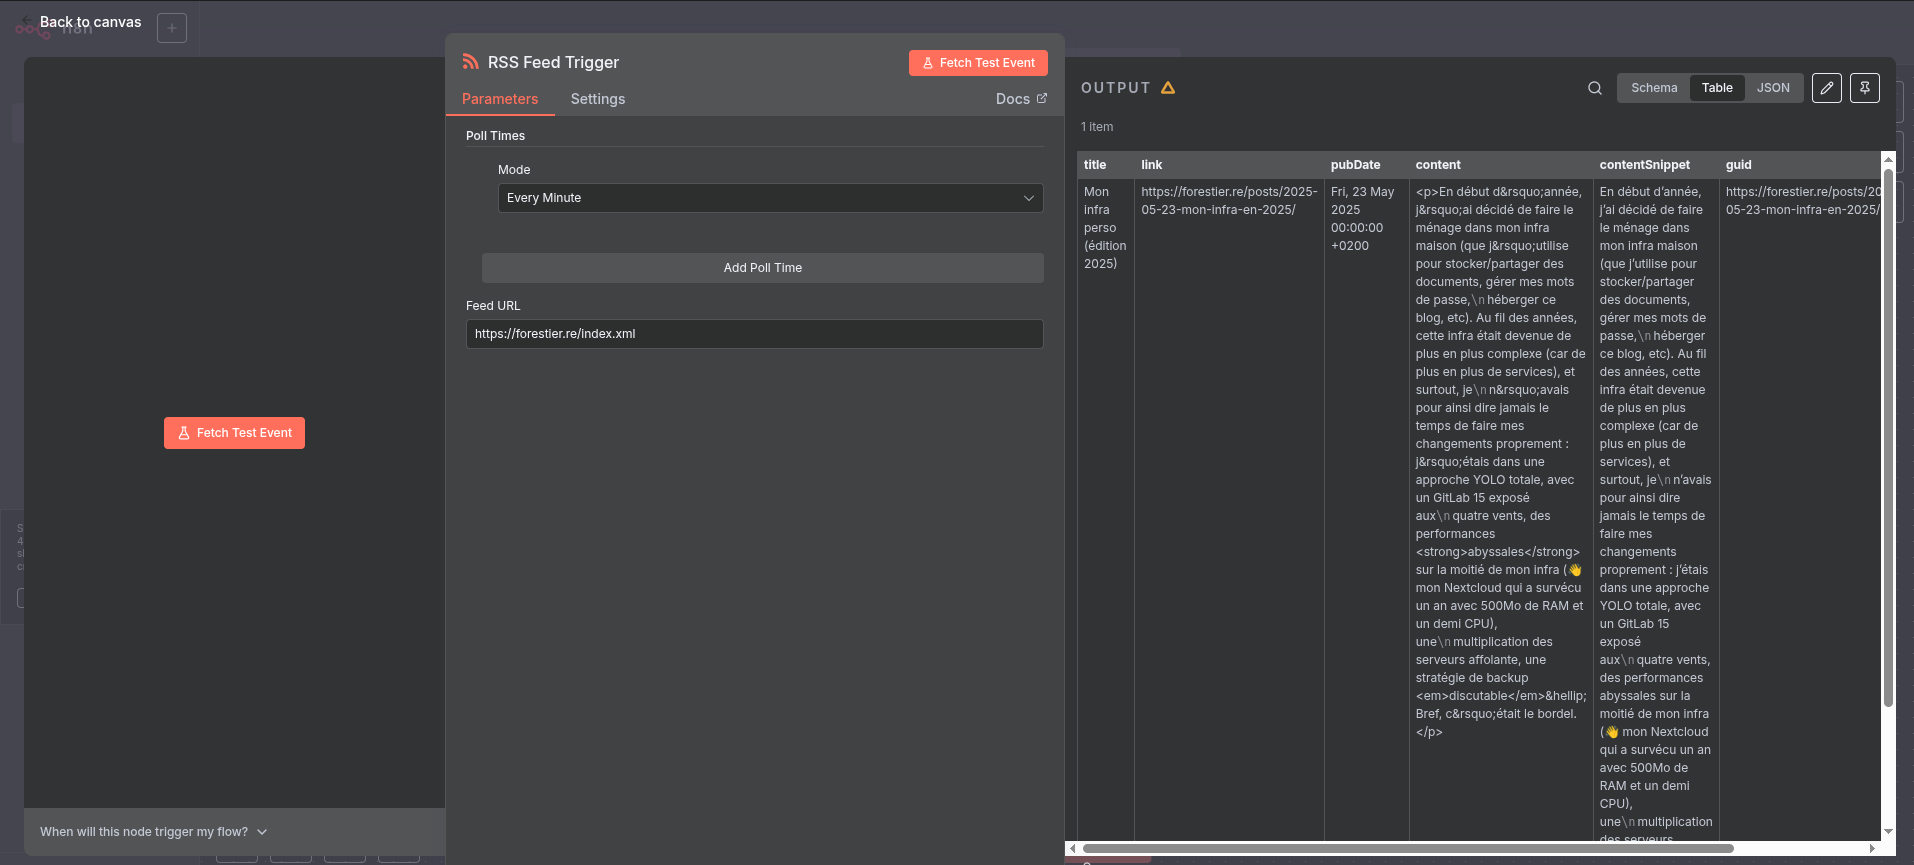
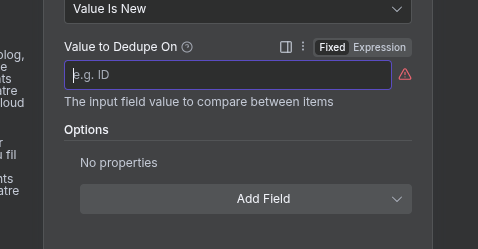
Hurray, we have retrieved content! We can now use it. Click on “Back to canvas” at the top left, then on the small “+” located to the right of your first node. For now, your workflow will execute every time, even if I haven’t published anything new. That’s nice, but you risk being quickly spammed. We are therefore going to add a node that will delete elements we have already seen in the past. In the search bar, type “Remove Duplicates” and select the node with the same name, then “Remove items processed in previous executions”. The configuration window then opens. Here, the field that interests us is “Value to dedupe on”. This field allows defining which element of our RSS feed will be used to know if the content has already been seen by n8n or not. Switch the field to “Expression” mode (see screen just below), and type {{ $json.guid }} (note: you can also drag and drop from the JSON element to the left of the configuration).
Thanks to this node, the following nodes will only receive elements that have never been processed by n8n. The others will be removed from the list (which is very practical for only receiving new published articles). And so on, you will be able to add other nodes, perform transformations, etc.
Know that n8n offers many other features, notably sub-workflows, which allow mutualizing pieces of complete workflows. We’ll see it later, as we are going to use it for our automatic update system.
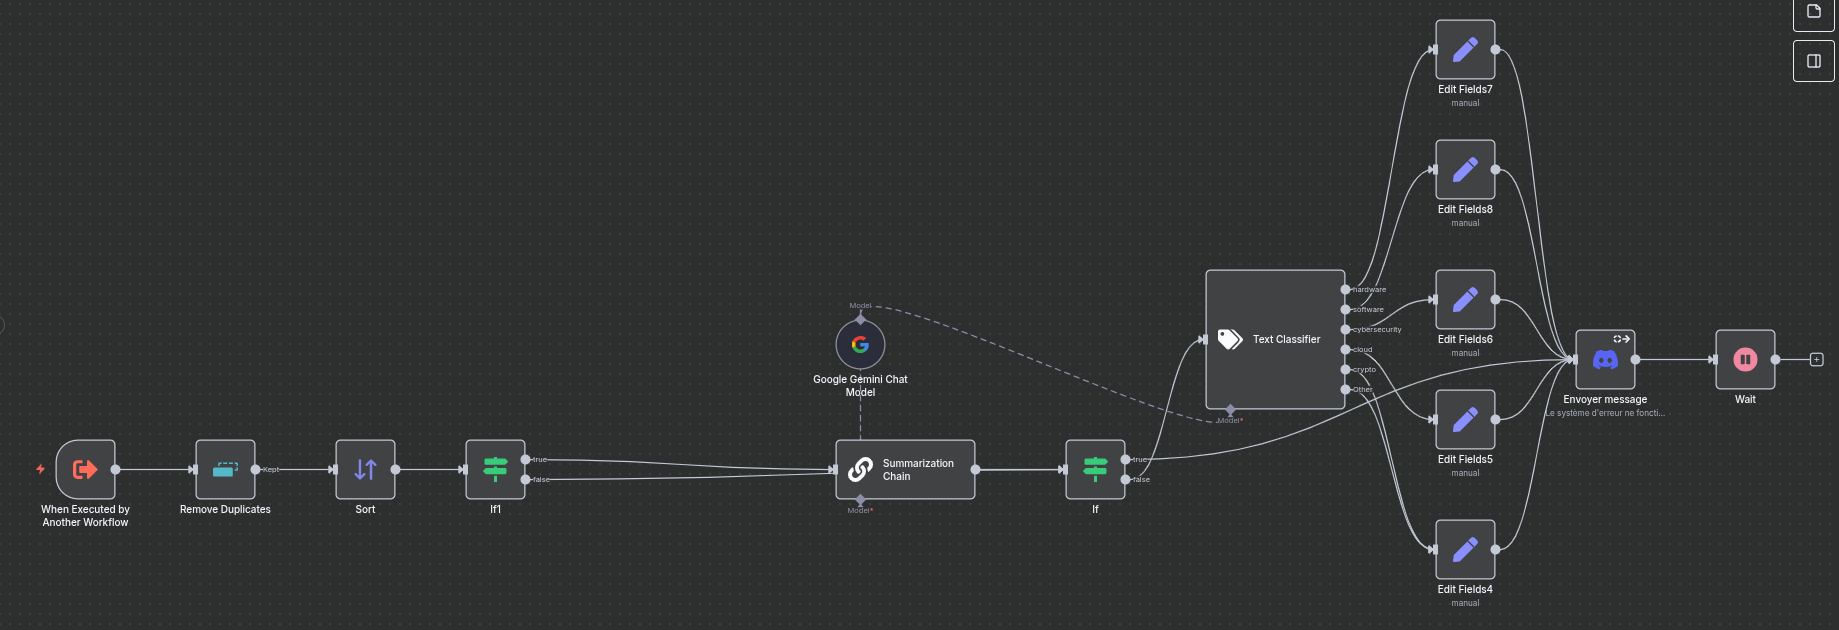
As you can see, workflows can quickly grow…
Now that we’ve seen the basics of n8n, let’s get to the heart of the matter: updating our containers automatically.
Updating My Services Automatically - Attack Plan
As a reminder, our service to be updated is already:
- Deployed as a Swarm service;
- With Ansible;
- All started in CI/CD from GitLab + a runner.
For the example, we are going to take the n8n service already deployed (yes, n8n will update itself, and yes, it will work). The system is exactly the same for all your other services, so feel free to duplicate the example.
1. Modifying My Ansible
To achieve our need, we are going to play with GitLab’s tags system, and Ansible’s extra-vars. The idea is simple: When n8n detects a new version, it will create a tag in GitLab. This will then trigger a CI automatically and communicate the name of the created tag to Ansible, which will use it to deploy the new version of the service using the tag name as the Docker image version.
Let’s take our Ansible and simply variabilize the service version:
---
- name: "deploy n8n"
  hosts: app_servers
  vars:
    data_location: "/srv/n8n" #Change with your value
  tasks:
    - name: "create dirs"
      ansible.builtin.file:
        path: "{{ item }}"
        state: directory
        mode: '0777'
      loop:
        - "{{ data_location }}/data"
        - "{{ data_location }}/files"
    - name: "Create n8n service"
      run_once: true
      community.general.docker_swarm_service:
        name: "n8n"
        image: "docker.n8n.io/n8nio/n8n:{{ version }}" # <-- HERE!
        mode: "replicated"
        replicas: 1
        mounts:
          - source: "{{ data_location }}/data"
            target: "/home/node/.n8n"
            type: "bind"
          - source: "{{ data_location }}/files"
            target: "/files"
            type: "bind"
        publish:
          - mode: "ingress"
            protocol: "tcp"
            published_port: 5678
            target_port: 5678
        rollback_config:
          failure_action: "pause"
          order: "stop-first"
        update_config:
          failure_action: "rollback"
          order: "stop-first"
          monitor: "1m"
        restart_config:
          condition: any
          delay: 5s
          max_attempts: 3
          window: 120s
Now, modify your .gitlab-ci.yml file to make the following changes:
- Add
--extra-vars "version=$CI_COMMIT_TAG"in the execution command of the Ansible playbook; - Start it automatically when a tag is created.
A functional example file would be:
stages:
  - deploy

deploy:
  image: ansible:latest
  stage: deploy
  script:
    - ansible-playbook --key-file /id_rsa --extra-vars "version=$CI_COMMIT_TAG" -i inventories/servers playbook.yml
  when: always
  only:
    - tags
Our Ansible (and GitLab) is now ready for the rest of the operations.
2. Creating My Discord Bot
Now we are going to need a Discord bot. Go to https://discord.com/developers/applications and create a new application. Give it whatever name you like.
In the “OAuth2” tab, retrieve the Client ID of your bot. Then, go to the following page:
https://discord.com/oauth2/authorize?client_id=YOUR_CLIENT_ID&scope=bot&permissions=377957247040. This link allows you to add the bot with permission to send and manage messages (which will be very useful to us) to your server.
3. Creating Credentials
Now that we have everything we need, it’s time to tell n8n how to authenticate to our GitLab and our Discord Bot. Instead of creating a Workflow, create a “Credential” (the small arrow to the right of “Create Workflow” allows you to create one). Search for “Discord” in the search bar, and create a Discord Bot Account. Indicate the bot token (you’ll find it in the Discord developer console, “Bot” tab, then “Reset Token”).
Do the same with GitLab: Create a “GitLab API” type Credential. Your access_token simply needs the api scope.
That’s it, n8n has all the required plumbing. Now, it’s time to create our workflow!
4. Retrieving Information
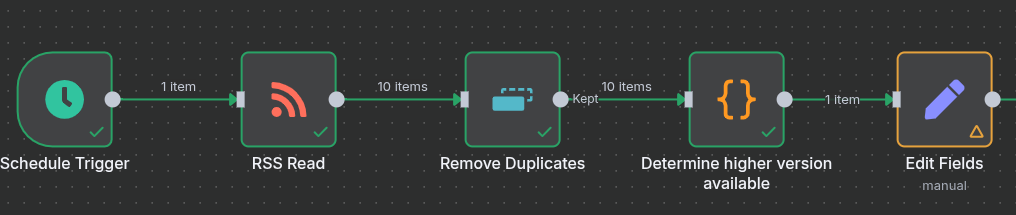
Let’s start by creating a new workflow. Since I like my workflow to launch in Cron mode, I’m going with a “Schedule Trigger” that launches every night at 2 AM (I’m not going to show you this step, we already did it above 😁). Then, I’m going to retrieve the releases published on n8n’s GitHub repository. The URL is: https://github.com/n8n-io/n8n/releases.atom. For this, simply use an “RSS Feed” node. Then, I remove duplicates with a “Remove Duplicates - Remove Items Processed In Previous Executions” node (which we’ve already seen, remember) on the key {{ $json.title }}.
5. Parsing Information
And here’s the catch: n8n can potentially return several versions at once! For example, a fix on v1.106.x which is also backported to v1.105.x. I therefore use a “code” type block, which allows me to check the semantic-versioning to only keep the most recent one. The code is as follows:
let newest = "0.0.0"

for (const item of $input.all()) {
  let testClean = item.json.title.replaceAll("n8n@", "")
  let cleanSplitted = testClean.split(".")
  let newestSplitted = newest.split(".")

  if (cleanSplitted[2].includes("-rc")) {
    continue
  }

  if (parseInt(cleanSplitted[0]) > parseInt(newestSplitted[0])) {
    newest = testClean
  } else if (parseInt(cleanSplitted[0]) === parseInt(newestSplitted[0])) {
    if (parseInt(cleanSplitted[1]) > parseInt(newestSplitted[1])) {
      newest = testClean
    } else if (parseInt(cleanSplitted[1]) === parseInt(newestSplitted[1])) {
      if (parseInt(cleanSplitted[2]) > parseInt(newestSplitted[2])) {
        newest = testClean
      }
    }
  }
}

if (newest != "0.0.0") {
  return {version: newest};
}
return []
We now have the most recent version at our disposal. It’s time to ask the administrator (you!) if you wish to install this version or not. Yes, we’re automated, but we’re not completely crazy either.
Just before, we are going to add an “Edit Fields” step, which will allow us to only keep some information that interests us (and incidentally, it will simplify the task if one day you switch to a sub-workflow system).
The fields your Edit Fields should indicate are:
- Technical fields:
version: The value is a String being{{ $json.version }}of type Expressiongitlab_project_id: The value is a number being the id of your project containing the Ansible on GitLab, of type Fixed- Note: To find your project ID, go to your GitLab project, Settings -> General. The projectID will be indicated next to the name.
- Fields to improve the display in Discord:
name: The value is a string beingn8nof type Fixedrepo_name: The value is a string beingdocker.n8n.io/n8nio/n8nof type Fixedchangelog_link: The value is a string beinghttps://github.com/n8n-io/n8n/releases/tag/n8n%40{{ $json.version }}of type Expression
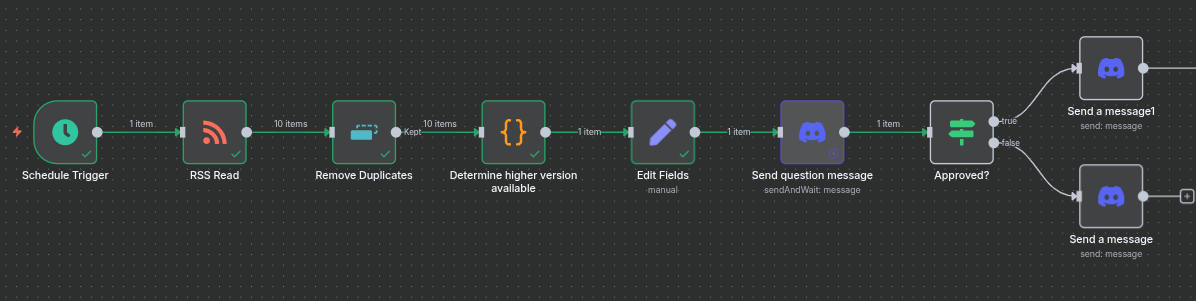
Here is what your workflow looks like for now:
6. Asking the Admin’s Opinion
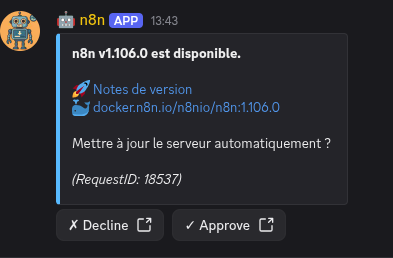
The idea here is to inform the administrator (= you) that an update is available and let you choose whether to install it or not. This system thus allows you to keep control over what happens on your infra. It avoids, for example, launching a breaking-change update without having made a backup, or taking down a service right when you need it…
For this, we are going to create a new “Discord” “Send message and wait for response” node. This node will send a Discord message that will contain two buttons: one to accept, the other to refuse. Depending on the action performed, the workflow will continue or not. Configure the node to send the message in the desired channel.
You can use the following message (in Expression mode):
**{{ $json.name }} v{{ $json.version }} is available.**

🚀 [Release notes]({{ $json.changelog_link }})
🐳 [{{ $json.repo_name}}:{{ $json.version }}](https://hub.docker.com/r/{{ $json.repo_name }}/tags)

Update server automatically?

*(RequestID: {{ $execution.id }})*
Define the “Response Type” to “Approval”, with “Approve or Disapprove” as “Type of Approval”. You can launch the execution to see if the message is received or not.
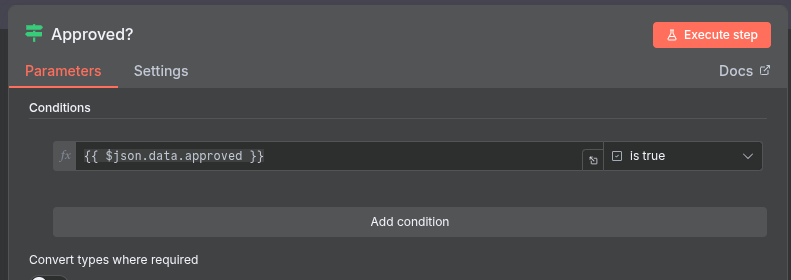
Then, create an “If” type node. The condition is as follows:
{{ $json.data.approved }}is true(Boolean -> is true)
You can then send a cancellation message on the “False” branch… and on the True branch, it’s time to connect our GitLab! Currently, our workflow looks like this:
7. Pushing to GitLab
Now, all that’s left is to create our tag in GitLab and watch the pipeline result. I’m going to be a bit more synthetic in my explanations because normally, you’re starting to understand the logic!
On the continuation of the “True” branch of our condition, let’s create an “HTTP Request”. Here is the configuration detail:
- Method:
POST - URL:
https://<YOUR_GITLAB_URL>/api/v4/projects/{{ $('Edit Fields').item.json.gitlab_project_id }}/repository/tags - Authentication: “Predefined Credential Type”
- Credential Type: “Gitlab API”
- Gitlab API: “GitLab account” (or the name you gave to your GitLab credential)
- Send query parameters: Yes
- Specify Query Parameters: Using Fields Below
- Query Parameters:
- Name:
tag_name- Value:
{{ $('Edit Fields').item.json.version }}
- Value:
- Name:
ref- Value: Your main branch on the project (probably
mainormaster)
- Value: Your main branch on the project (probably
- Name:
This node has two outputs: Success or Error. In case of error, simply send a Discord message.
In case of success, we are going to start checking our pipelines. Here is the process:
- Wait 2 minutes (Wait node)
- Check pipeline status with an HTTP request (HTTP Request node)
- Method:
GET - URL:
https://<YOUR_GITLAB_URL>/api/v4/projects/{{ $('Edit Fields').item.json.gitlab_project_id }}/pipelines - Authentication: “Predefined Credential Type”
- Credential Type: “Gitlab API”
- Gitlab API: “GitLab account” (or the name you gave to your GitLab credential)
- Method:
- Keep only the first received pipeline (Limit node)
- Check if this pipeline status is finished or not (If node). The conditions are:
{{ $json.status }}is equal tosuccessOR{{ $json.status }}is equal tofailedOR{{ $json.status }}is equal tocanceled
- If not finished, go back to the “Wait” block; otherwise check state (success or not, If node):
{{ $('Check pipeline status').item.json.status }}is equal tosuccess
- If yes, send a success message on Discord, otherwise a failure message.
And here is the final look of our pipeline (the JSON is given under the conclusion):
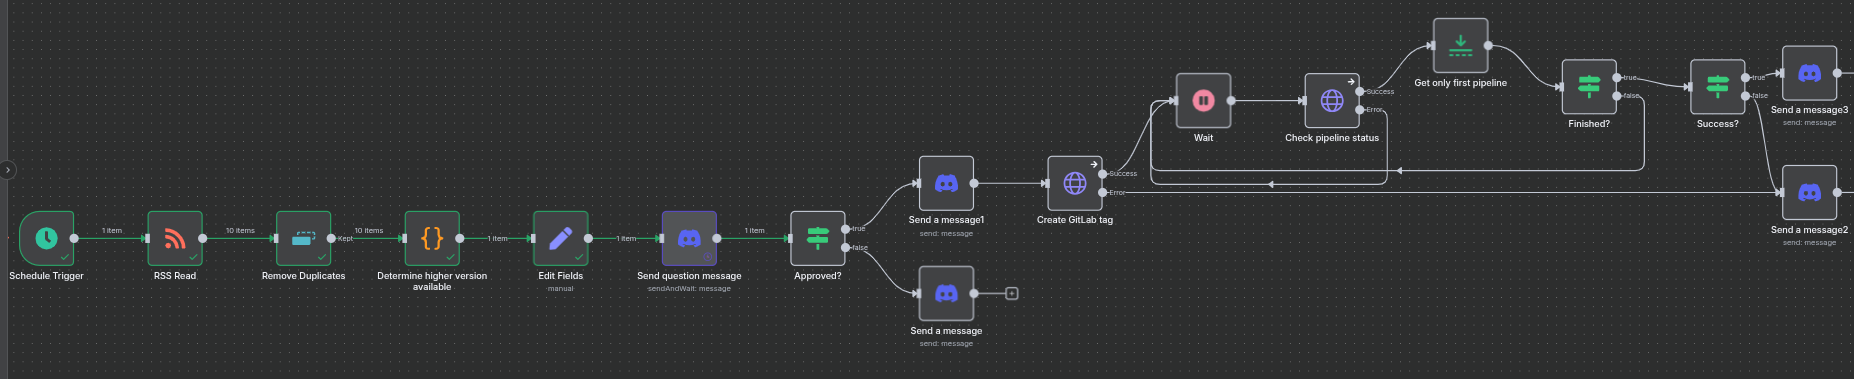
All you have to do now is activate your Workflow (the small “Inactive” at the top right next to the Share/Save buttons), and you now have an n8n that auto-updates! 🎉 All you have to do is repeat with your other services (you’ll see, it goes much faster).
Incidentally, use a Sub-Workflow! Everything after your “Edit Fields” is actually generic to all your projects and services. Copy all these nodes and move them into a separate workflow, and use an “Execute Sub-workflow” node. Thus, you mutualize a huge part of your workflow and simplify maintenance.
Conclusion
Now you know how to use n8n to automatically update your infra. With the few tips given above, you will soon be able to update all your containerized services automatically. Of course, one must remain careful when using these kinds of tools: beware of breaking changes, double-check that the Docker image exists, and your orchestrator’s update and rollback policy. In short, trust in the tool does not exclude control!
For improvements, several paths can be considered:
- Use an AI to detect breaking changes in the changelog and inform the administrator before deployment;
- Add nodes to launch backups;
- Check service status directly on the orchestrator (here, we just use the pipeline status, which is potentially light as a check…);
- And many other things.
At home, this tool now serves me daily to update n8n, my mail server, my VaultWarden, my Nextcloud, GitLab, Grafana, and many other services. It’s a huge gain in time and energy because you only have one click to perform in Discord. Thus, even on vacation, urgent security fixes don’t have to wait!
The idea of this post was also to present to you the huge advantage and interest of a tool like n8n. Tech watch, real-time infra updates, on-demand document summarization… The possibilities are almost infinite, so go for it!
The JSON dump of the complete workflow is available here.