Docker Swarm, what is it (and how does it work)?
⚠️ This article is an automated translation. While I personally reviewed the content before publication, some inaccuracies may remain. Read the original French version.
In life, we all have battles that we know are lost in advance but that are close to our hearts. A sort of obsession, an irrational thing that no one really understands, except you. Today, let me introduce you in more detail to one of my obsessions: Docker Swarm.
In two words before starting, Docker Swarm is a container orchestrator that has the particularity of doing clustering: you install Docker Swarm on several servers (or virtual machines), and Docker Swarm will automatically distribute your containers across these machines. Docker Swarm has been around for several years now and is considered a mature product that can be used without major drawbacks in production. It is an alternative to another much better known, hyped, and used tool: Kubernetes.
The Genesis of Docker Swarm
It all started in 2014 (10 years ago). At the time, Docker was a newly emerging product, and some users were beginning to need high availability for their deployments. The strategy back then was quite basic: you deployed containers yourself on several machines and managed each container independently of the others. It was heavy to manage, complicated to maintain, updates were risky… In short, no one liked it. That’s when several projects emerged to try to simplify all this, notably Docker Swarm and Kubernetes.
These tools are built as “wrappers” around Docker: instead of creating containers directly on Docker, you create a “service” on Docker Swarm or Kubernetes, which then takes care of deploying it, keeping it up to date, making it communicate via virtual networks, and so on. Later, Kubernetes would remove the mandatory link to Docker by allowing the direct use of containerd as an isolator, but that’s another story.
And at the time, Docker Swarm was a bit (mild euphemism) quite poor: It worked poorly, especially the network part, service updates were complex, etc. Kubernetes took a huge lead, notably pushed by Google engineers who were at the helm of the project and who offered “Kube as a Service” deals in Google Cloud Platform with the subtlety of a herd of elephants visiting a porcelain museum.
And so Docker Swarm lived, from 2014 to 2018, a slow and long agony, plagued by technical bugs, functionally and technically overtaken by Kubernetes, abandoned by the Docker company which saw no future in it… Until early 2019, when Docker announced the arrival of Docker Swarm.
Docker Swarm != Docker Swarm
If you read my previous line correctly, you probably thought I wrote nonsense without proofreading. But no, I stand by my previous sentence; because Docker Swarm is not Docker Swarm.
As said before, the first version of Docker Swarm was a wrapper around Docker. In 2018, Docker abandoned the project faced with the total failure of the attempt to compete with Kubernetes and the deep disinterest of the community. This version is now called “Docker Swarm Classic”, and is alone responsible for the majority of biases and defects often blamed on Swarm.
Then, in 2019, Docker (notably with the buyout of Enterprise activities by Mirantis) announced the return of Docker Swarm, but this time, Swarm is built directly into Docker: when you install Docker, Swarm is provided in the binary, ready to be used. This means that Swarm can access all Docker APIs (and even more), and that compatibility between Docker Engine and Docker Swarm is always guaranteed. Furthermore, this standardization makes learning Swarm very simple: if you already use Docker, you already know 90% of Swarm! And it’s from there that Docker Swarm became a truly interesting product.
And it’s also where we leave the history of Swarm to start talking about technical considerations! As you understood, we will talk in this article exclusively about Docker Swarm (from 2019 to today), and not about the classic mode. Let’s go.
Setting up a Lab
For the rest of this post, we will consider that we have three virtual machines that can talk to each other. If you have a physical or virtual firewall, you must ensure that the following ports are open between your three virtual machines:
7946/tcp&7946/udpfor overlay network discovery;4789/udpfor Docker overlay networks;2377/tcpfor communication between managers;- And the
IP 50(IPSec) protocol for encrypted networks.
If you don’t have virtual machines or hardware at home, I highly recommend d2-2 instances at OVHCloud, or DEV1-S at Scaleway (about 1 cent per hour), which allows you to have a functional test environment at a very low cost.
You can deploy any Linux distribution on these instances, as long as it is possible to install Docker (Community Edition) on it. For my tests, I usually use Alpine Linux, as the installation is very easy (apk add docker) and the image is very light, which greatly optimizes resource use.
Technical Concepts
The Nodes
As seen above, Docker Swarm is a tool for clustering Docker servers. For this, Docker Swarm relies heavily on the operation of Docker Engine to extend its functionalities and make them work between several machines sharing the same physical network.
In Docker Swarm, a machine is called a node. A cluster can contain as many nodes as you want. These nodes are divided into two categories: manager nodes and worker nodes.
The Managers
A manager node is responsible for the cluster: it allows the user to type commands to manage the state of the cluster and the services deployed on it. It manages service scheduling, checks their health status, restarts services as needed, etc.
Each cluster (normally) has several managers. To synchronize everyone, Docker Swarm uses a consensus algorithm (called Raft), which makes all managers move in the same direction. For this, the cluster elects a Leader, guarantor of the cluster’s state. This leader is elected by a voting system, the node with the majority of votes wins the election. If the leader goes offline, the cluster organizes a new election. For this reason, it is recommended to always have an odd number of manager nodes: otherwise, you risk finding yourself in a cluster where no one manages to get 50% of the votes!
For cluster users, the notion of Leader is an invisible concept: any manager node can accept commands and apply them.
Finally, managers can also execute the services (= containers for now, we’ll talk about it) defined by the user, and this is even the default behavior. You can therefore have a cluster composed 100% of managers.
The Workers
A worker is a type of node with fewer privileges in the cluster: it content itself with executing services. A worker cannot receive commands from a user, does not participate in the leader election, and so on.
Workers are recommended only for very specific needs (deployment of services that must remain isolated or that must not be impacted by the control plane, etc.). In our lab, we will not use workers.
The Services
In Docker Swarm, we don’t deploy containers, but services. A service is defined by a Docker image that we will launch (like a container), and which will have additional options compared to a classic container, notably to manage high availability and updates.
A service can be updated, and every property of a service can be changed without needing to destroy and recreate it (environment variables, image version, etc.).
Thus, in addition to ports, volumes, environment variables, we will be able to define:
- Healthcheck: In addition to the healthcheck of a Docker container, Swarm will automatically restart unhealthy services;
- Replications: We can define the number of copies of the service that must run at the same time, either by indicating a number of replicas or by forcing Swarm to launch an instance of the service on each node;
- Update and rollback policies: We can define to Docker Swarm how to update a service (how many containers to delete/recreate in parallel, with what delay between each operation, etc.), as well as the rollback policy in case of update failure (go back, pause the deployment, etc.).
Once all these possibilities are taken into account, here is what a service declaration can look like:
docker service create \
  --name demo-website \
  --update-delay 10s \
  --update-parallelism 1 \
  --replicas=2 \
  --publish published=8000,target=80,mode=ingress \
  --update-failure-action rollback  \
  --health-cmd 'curl http://localhost/index.html --fail' \
  --health-interval 2s \
  --health-retries 4 \
  --health-start-interval 10s \
  httpd:latest
Don’t worry, we’ll review all of this together later.
The Network
In Docker Swarm, a network created on one machine is automatically propagated to other machines. Thus, a docker network create --scope swarm hello will generate a Docker network usable on all three machines of your cluster (and if you add machines, these new machines will automatically pick up the network). Services using this network will be able to communicate with each other and between the physical nodes of your cluster in a totally transparent way.
The icing on the cake, if your cluster needs to communicate over the Internet to exchange information (example: you only have one network card that goes out to the Internet on your machines), you can encrypt the network natively via IPSec: docker network create --scope swarm --opt encrypted=true hello.
For the rest: everything works exactly like on a classic Docker node! In addition to Docker networks, Swarm brings two very practical features:
Integrated DNS
As on a “classic” Docker network, Swarm brings integrated DNS into Docker virtual networks. Thus, tasks.SERVICE_NAME will return the IP of all active containers of a specified service.
Even more practical, this DNS record only shows containers that are healthy! Thus, a container starting up or unhealthy will not be exposed. This operation allows you to easily interconnect services, using a DNS record to make these services communicate with each other.
The Service Mesh
When you publish a port on a service, it is possible to publish this port in two different ways: overlay and host.
In overlay mode, Docker Swarm will automatically take requests arriving on any machine in the cluster and redirect them invisibly to a node in the cluster that actually exposes this service. For example, an HTTP server running in a single replica on the cluster can actually be reached on all three IP addresses of the cluster!
In host mode, Docker Swarm does not forward packets from one node to another: the service is exposed on the machines on which it is currently running.
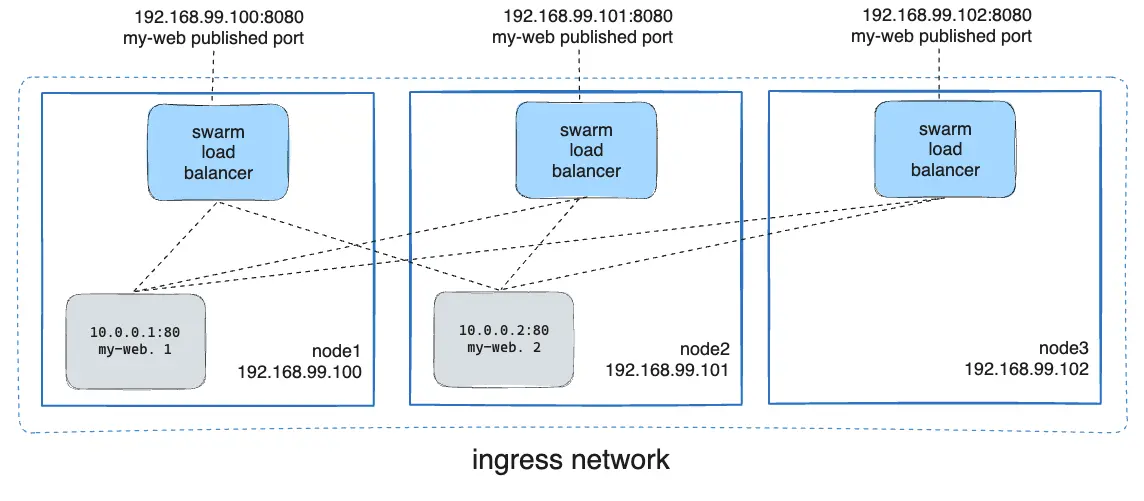
Here, this diagram summarizes the operation of Docker Swarm’s Service Mesh, if you expose a port in ingress mode: all machines can respond to a request on this port, because Swarm redirects calls transparently to a container somewhere on the cluster.
Storage
This part will be very quick: Docker Swarm does not offer any way to store data between nodes. If you need to share data between nodes (for example for a shared database, or a file server), you will have to deploy a file server yourself (Ceph, Gluster, or other).
Note however the upcoming arrival of CSI within Swarm.
However, Docker Swarm includes configuration and secret management thanks to docker secret and docker config. These two commands allow creating secrets and configurations in the form of files, which can then be loaded into services. These secrets and configurations are read-only and cannot be updated: if you need to make a change, you must create a new version of the secret/configuration and update the service with it.
We have just finished reviewing the technical concepts of Docker Swarm. Still there? Perfect, let’s move on to the practical part now!
Hands-on with Swarm!
Deploying our Cluster
First, we are going to deploy our Swarm cluster. For this experimentation, I am using three virtual machines (2vCPU, 2GB of RAM, 10GB of disk) on a private OpenStack. I install the machines under Alpine Linux 3.20, but feel free to install another OS: the only condition for it to work is that Docker is available on this distribution. Any Debian-based or RHEL-based distribution will do. On these three machines, I install Docker exactly the same way as for a standalone mode. For your distribution, consult the official installation guide.
If you have a logical and/or physical firewall, remember to open the necessary ports (see Setting up a Lab).
Now that our cluster is ready (each machine responds “correctly” to a docker ps -a), we are going to set up our Swarm cluster. On the first machine, type the command docker swarm init. Docker will tell you that a Swarm node has been successfully created and that you can start adding people to the cluster. Be careful, the token indicated by Swarm after this command is a token to join workers, but we want managers. Let’s type the command docker swarm join-token manager to get the command to add manager nodes to the cluster; and copy this command to your other two virtual machines.
Congratulations, you have just set up a Swarm cluster. 🎉
To make sure, you can type the command docker node ls. The command should display something similar to this:
ID             HOSTNAME   STATUS    AVAILABILITY   MANAGER STATUS   ENGINE VERSION
bc91l1i0kx *   swarm-1    Ready     Active         Reachable        26.1.5
5t4xm4b3h4     swarm-2    Ready     Active         Reachable        26.1.5
bea6az2b4w     swarm-3    Ready     Active         Leader           26.1.5
The most important thing here is that all instances are in Ready status, and that all our machines are in manager status Reachable or Leader: this means that everyone can communicate together.
Managing Nodes
The command docker node ls allows getting interesting information about our cluster:
- The identifier of each machine;
- The name of each machine;
- Its status (
ReadyorUnreachable); - Its “availability” (
ActiveorDrain); - Its status within the cluster (
Leaderif master of the cluster,Reachableif this node can become manager, and empty if the node is a worker); - And finally, the version of Docker Engine present on this machine.
You can add as many virtual machines as you want, you just need to get a new token with the command docker swarm join-token manager|worker and repeat the operation we just performed. A node can only belong to one Swarm cluster at a time.
It is also possible to promote or demote a node: docker node promote <id> allows transforming a worker into a manager, and docker node demote <id> allows doing the opposite. I personally find the utility of this feature quite limited, but anyway.
We will come back a little later to nodes and notably to labelling and this notion of “Availability”. In the meantime, our cluster is working, so let’s create a service!
Our First Service
A service, in Swarm, is the heart of the matter, since it’s the containers you will deploy on your cluster. Technically, a service is a Docker container definition, with some additions notably on replication and update management. Swarm takes services as parameters and will generate a set of containers on your infrastructure so that the service behaves as you described it.
For those used to the Kubernetes world, a major difference here compared to pods is that a service manages a single container definition: for example, a “monitoring” pod on Kubernetes containing your Grafana/Prometheus will have to be represented here in the form of two services; one dedicated to Prometheus and the other to Grafana.
A service is always deployed across the entire cluster: you can add affinity rules to define where the containers will be generated, but by default, any member of the cluster can be chosen to run a container of your service.
On each service, we will be able to define the number of replicas:
- If the replication mode is
global, a container of the service will be started on each physical instance; - If the replication mode is
replicated, the user controls the number of containers of the same service active on the cluster: for example, a replica 2 on ourgrafanaservice will allow starting two containers of that service on our three physical machines.
To summarize all this information, here is a small demonstration diagram:
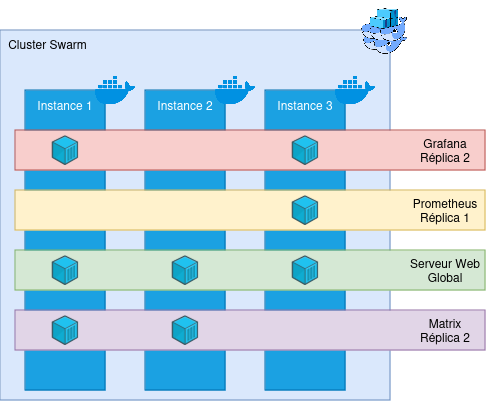
Here, we have a cluster of three machines, and 4 services are deployed on it: Grafana, Prometheus, a Web server, and a Matrix server, each with different replicas. Docker Swarm will then contact the Docker Engines on the physical machines and start containers on these physical machines. In addition, Swarm will add a bit of interconnectivity between machines (see the Network part for a quick reminder). Even if instance 2 does not have a Grafana container deployed, it is aware that this service exists.
Let’s create our first service, very simple:
docker service create \
  --name demo-website \
  --mode replicated \
  --replicas 2 \
  --publish published=8000,target=80,mode=ingress \
  httpd:latest
Here, we are going to create a very simple service, named demo-website, which will be replicated on two nodes of our cluster. This service will also expose port 8000 to port 80 in ingress mode (which means Docker will perform service mesh); and is based on the httpd:latest image.
Run this command in your lab, and if all goes well, you should be able to access this service from any node in the cluster! Congratulations, you have just created your first Docker Swarm service.
You will see here that we used a Docker image: this means that any Docker image is natively compatible with Swarm. You basically have no action to take to move from a Docker to a Docker Swarm (unless your application is stateful, of course).
From any machine in the cluster, you can run commands to control the services:
docker service lsallows you to see all the services currently deployed on the cluster, as well as a brief summary of the state of the service (number of replicas, image used);docker service ps <service_name_or_id>allows you to see the location of the containers deployed for your service, and their state (whether they are up/down, for how long, etc.). It is worth noting that a container that dies will be automatically destroyed and recreated elsewhere by Swarm, making it a fairly on-call friendly system.docker service logs <service_name_or_id>allows you to see the logs of the entire service; that is, of all containers currently running the service, but also of all old containers of this service.docker service inspect <service_name_or_id>allows you to see the entire configuration of a service: its creation date, update date, the communicated environment variables, etc.docker service rm <service_name_or_id>which allows you to delete a service (😢).- And
docker service update [...] <service_name_or_id>, which allows updating a service (but we’ll talk about it later!).
Run these few commands and familiarize yourself with the Docker Swarm CLI.
We can also modify the number of replicas of a service (only in replicated mode): Type the command docker service scale demo-website=3, and check with docker service ps: we have just created a new replica of our container! It is thus very simple to scale-up/down our services.
Once you feel ready, we’ll move on to some more complex service creations… (and delete the service we just created).
Healthcheck
If you put a healthcheck on your service, Docker Swarm will automatically monitor the state of each container and restart the unhealthy containers! This system allows you, when used correctly, to drastically reduce downtime and your night calls. 👀
Swarm’s healthcheck is totally based on Docker’s; so the arguments to provide are identical to those of creating a container:
docker service create \
  --name demo-website \
  --mode replicated \
  --replicas 2 \
  --publish published=8000,target=80,mode=ingress \
  --health-cmd 'curl http://localhost/index.html --fail' \
  --health-interval 2s \
  --health-retries 4 \
  --health-start-interval 10s \
  httpd:latest
Here, we add a few healthcheck options to our service description: Every two seconds, we are going to contact http://localhost/index.html from inside each container. If the test fails 4 consecutive times, then Swarm will destroy the container and recreate one. Finally, we add a small delay at the time of container creation with --health-start-interval to give the container time to start before testing its state.
Run the command and watch how the healthcheck works. You can also destroy and recreate the service with a deliberately wrong check command to see Swarm in action.
It is worth noting that Swarm does not wait passively for information from the Docker Engine; it supervises it by itself: if you have fun deleting a container of a service, Swarm will automatically detect it and recreate a new one immediately after (you can have fun with docker rm -f $(docker ps -aq) on one of your nodes to see proof).
Delete your service for the last time, because it is now time to see how to update a service!
Updating our Service
On Docker, you are used to having to delete and recreate your container when you need to modify its behavior, its image, or other. On Docker Swarm, a command is available to us for this: docker service update. This command is extremely useful, as it will allow us to perform operations on our services (update a version, an environment variable, a configuration or other) without interrupting our service!
First, we are going to recreate our service, but this time with a few more arguments: update and rollback configurations:
docker service create \
  --name demo-website \
  --mode replicated \
  --replicas 2 \
  --publish published=8000,target=80,mode=ingress \
  --health-cmd 'curl http://localhost/index.html --fail' \
  --health-interval 2s \
  --health-retries 4 \
  --health-start-interval 10s \
  --update-delay 10s \
  --update-parallelism 1 \
  --update-failure-action rollback
  httpd:latest
Here we define to Docker Swarm that it will be able to update one container at a time and respect a delay of 10 seconds between each update. In case of failure, we ask Swarm to perform a rollback of the service update. The complete reference is available in the documentation.
A service update allows modifying absolutely any element of your service: configuration, environment, command communicated to the entrypoint, the Docker image used, the published ports, etc… The complete reference is available in the documentation.
In our first example, we are going to try to update our service to replace our httpd server with a MariaDB server: it is therefore very unlikely that this will work, since many details will be missing for the service to start (starting with an administrator password), and the healthcheck cannot work anyway. Let’s see how Swarm behaves: docker service update --image mariadb:latest demo-website.
Quickly, you should have a “task failure detected” on your screen, and Swarm will automatically return to the old image definition (and therefore to the classic Web server). Moreover, your service was not interrupted for a single second from your users’ point of view!
Now, let’s update our service to make it start a PHP server: docker service update --image php:latest demo-website. This time, the healthcheck should pass, and you should see your service update little by little, until you have a service converged. Congratulations, you have just updated your first service! It wasn’t complicated, was it? 😁 This logic applies to all update operations and is based on the same principle: Swarm destroys a first container to build the new version, waits for the container to be stable, then deletes a second one, and so on. If you understood the update logic with an image, you understood everything!
Since each call to docker service update leads to the deletion and re-creation of the service containers, we will make sure to group update operations rather than doing one command per parameter to update.
Finally, know that you can use docker service update --force <service_name_or_id>. The --force argument will force Docker Swarm to destroy and recreate the service containers, even if their configuration already corresponds to what Swarm knows. This operation can be useful for forcing the restart of a buggy service, for example.
(Anti-)affinity
Now that we know how to create services, manage them and update them, it’s time to talk about affinity rules within your cluster. Sometimes, you will need to force some services to start only on some physical nodes. The reasons can be diverse: regulatory compliance (for example, only one part of your infra is HDS), technical constraints (some machines belong to a particular VLAN and others don’t), etc. To manage this kind of situation, Docker Swarm has affinity and anti-affinity rules, based on labels and constraints.
A label is a textual element that can be added to a node of our cluster, or a service. They allow describing services or the infra and can be read by the cluster. These labels can be quickly added:
- On a node:
docker node update --label-add LABEL=VALUE <node_name_or_id> - On a service:
docker service update --label-add LABEL=VALUE <service_name_or_id>
And removed:
- On a node:
docker node update --label-rm LABEL <node_name_or_id> - On a service:
docker node update --label-rm LABEL <service_name_or_id>
These labels will allow us to define constraints on the services. Let’s add a label have_storage=true on our first instance (replace instance-1 with the name of the node in docker node ls): docker node update --label-add have_storage=true instance-1.
Now, we will be able to create a service that only has the right to start on nodes having this label and this value:
docker service create \
  --name nextcloud \
  --mode global \
  --constraint node.labels.have_storage==true \
  --publish published=8080,target=80,mode=ingress \
  httpd:latest
This service, even if it is in global mode, will only start on the first node, because it is the only one to respect its placement constraint! If a second node starts respecting the placement constraint, Docker Swarm will automatically generate a second container on the second node.
It is possible to combine constraints, and also use negative conditions. For example, we could use --constraint node.labels.have_storage!=true to start our service on all nodes not having the have_storage label equal to true.
There are a few other constraints, notably on the name and identifier of the node, the target operating system (very practical if you have a cluster composed of Windows and Linux hosts for example!), and so on. The detail is available in the documentation.
Finally, it is of course possible to update the constraints with docker service update. 😉
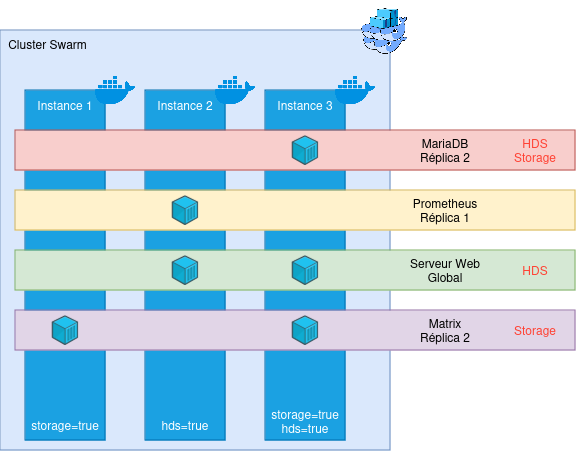
Small update of the diagram presented above: We now take into account constraints (indicated in red on the services). Swarm then manages deployments by taking into account these placement constraints automatically and dynamically.
We are starting to have a nice overview of Docker Swarm! We have seen how containers communicate with each other across several machines; how to manage services and manage their placement according to technical or functional constraints. We have only one thing left to see: how to update a physical machine without breaking everything?
And updating an entire machine?
In a cluster, it is logical and normal to have to perform heavy maintenance operations over time: updating an operating system, or simply our Docker Engine. Thanks to Swarm, we can make sure to perform these updates without interruption!
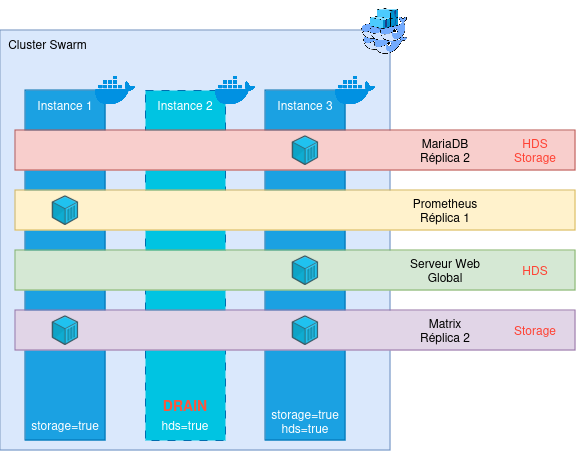
The only condition for this is that you have at least 2 nodes allowing to deploy any service (vis-à-vis the constraints). The diagram we just saw is for example a very bad example: only one machine has both the storage and hds label, which makes it indispensable in the life of the cluster - without it, services may not work! This will pose a problem for updates, but also in case of an unexpected failure of the machine; since Swarm will not know where to recreate the lost containers!
For the rest, we will consider that our cluster has several nodes that can host each service (once again: make sure this is always the case, for your own mental health).
The first step is to tell Swarm to evacuate the containers currently running on the node you wish to evacuate. For this, we are going to run a command: docker node update --availability=drain <node_name_or_id>. This command allows telling Swarm that the targeted node is no longer in a state to host containers. Swarm will then stop instantiating new containers on it and will move all existing containers elsewhere (this operation generally takes less than two minutes). Once the command is performed, you can check with the classic docker container ls the state of your physical node. Once the container list is empty, you can do whatever you want on the node, your cluster will not be impacted: turn off Docker, update it, restart the machine… In short, you are free!
Once your maintenance operations are finished, authorize Swarm to re-use this node: docker node update availability=active <node_name_or_id>. Containers will start recreating themselves in the cluster.
There is also the pause mode, which allows preventing Swarm from creating new containers, without killing the existing ones.
A more complete guide on a push maintenance operation is available on this blog, in the form of a feedback: Updating a Swarm cluster without interruption.
There you go, you now know (almost) everything about Swarm! Don’t hesitate to tinker more (notably by deliberately crashing a node) to evaluate the resilience of the tool for yourself.
Swarm - RETEX in Production
As I said at the beginning of this post (it was a long time ago, I know!), I am truly passionate about Swarm: it is simple, light, and easy to understand. It is a simple technology but one that meets very many needs while keeping the KISS philosophy that I love so much.
And I was able to develop this fascination during a professional experience of more than three years, managing several Swarm clusters hosting a total of more than 150 services, ranging from static websites to databases, including micro-services. I take this opportunity to thank Claude & Micka for the technological choice which was very relevant (and betting on Swarm in 2020 took guts given the desert crossing the project had just experienced!).
Over these three years, we have experienced highs and lows on the infrastructure, but Swarm was (almost) never at fault. It is an incredibly robust tool that manages to survive extreme cases (I remember in particular the time we lost our network storage for 6 hours, or the time two machines died simultaneously, forcing Swarm to run in single-node…).
With the right tooling (notably OpenTofu for the provisioning part and Ansible for deployment), it is possible to do very nice things with Swarm, for a very restricted run cost: taking care of the cluster itself is a non-issue, and updating a Swarm is much less constraining than updating a Docker single-node, as we have no service interruption.
Updates, let’s talk about them: Swarm is very stable in its operation and its APIs: We have already made updates 6 major versions apart (Docker Engine v20->v26) without any compatibility issues. In short, it’s robust and it won’t let you down.
In short, everyone is happy with the choice of Swarm, and its use is planned to be anchored in the years to come at BeYs.
In the end, the only cloud on the horizon is (perhaps) the ecosystem.
Swarm Ecosystem
Indeed, the ecosystem around Docker Swarm is quite underdeveloped, notably because of the dreadful 2014-2018 period and the hegemony of Kubernetes.
On the product itself, Mirantis (which bought Docker’s “Enterprise” activities in 2019) is contributing more and more and should normally bring Container Storage Interface (CSI) support during 2025, which will greatly improve data management between nodes (currently, you have to do everything by hand, with a GlusterFS, a CephFS or other). Moreover, a number of contributors are working on Swarm’s code in moby’s Github repository. Docker Swarm is therefore far from dead (and is even more alive than ever).
On the ecosystem around it, more and more attempts to structure and tool Swarm are appearing. We can already mention the Ansible collection dedicated to Docker (which includes 100% of Swarm), a great scheduled task system, and even attempts to make an ArgoCD-like for Swarm.
Many projects exist (the “Awesome Swarm” Github is proof of that), don’t hesitate to take a look and contribute if you have some time!
To conclude
To conclude, Docker Swarm is a great orchestration tool for your containers. It is certainly less complete than Kubernetes, but what it loses in functionality, it also loses in complexity. Swarm is ideal for teams that don’t need Kube’s RBAC and who wish to keep control over their infrastructure, while bringing resilience to their infrastructure.
And with the upcoming arrival of CSI in Swarm, it is more than time to give it a new chance and forget the mistakes of the past!